10

I have a ton of old self adhesive photo albums that I want to digitize. Most tutorials I find recommend removing the photos, but the albums are old enough that the adhesive has dried so if I remove the photos I won't be able to put them back in (I've already tried this once with a photo that I needed to examine the reverse side of).

I could just try scanning an entire page at a time, but then I would need a large scanner. I would also need to peel back the cover of each page to avoid a glare (or so I assume).

The only thing I can think of is setting up a camera to take pictures but that seems much more prone to errors with lighting and focus.

Is there an easier way that I'm missing?

3
  • genealogy.stackexchange.com/q/2698/104 might provide some useful tips
    – user104
    Commented Jul 3, 2013 at 8:30
  • My vote is for the FlipPal scanner Sue Adams mentions. It is really user friendly, light and portable and can stitch together mini-scans into one giant image. So what you scan is not limited to the size of the scanner. Commented Jul 10, 2013 at 4:41
  • How is this as much to do with Genealogy or Family History as, for instance, Photography of Filing? Why not Post both the size of your pages and roughly how many make 'a ton', please? Is that 27, or dozens or hundreds or roughly, how many? Either way, where does '… I won't be able to put them back in…' come from, please? That could apply if you were aiming solely at conservation without change. I guess you want restoration, which might well include putting things back differently. Commented Nov 4 at 22:03

7 Answers 7

8

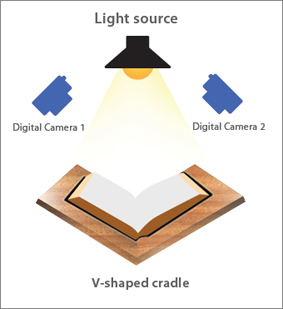
One way to do it is to use a DIY book scanner setup along the lines of the following picture:

enter image description here

The corresponding Wikipedia article has more information and links. There are also commercial kits available if you don't trust your engineering skills enough to create one yourself.

This set-up avoids problems with uneven light (you can set up and re-use a complex lighting system to equalise the light output at the pages), camera focusing (the distance from the cameras to the pages is near equal for subsequent pictures) and hand shake (the cameras are remote-controlled). It does however take some space and effort to create.

4

Personally, I'd use a camera.

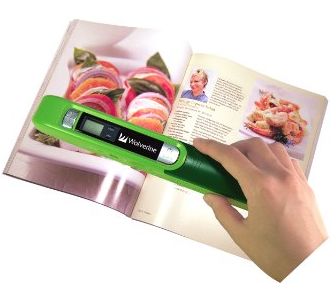
But if this task is important enough for you, and you want really good resolution without damaging the photos, then for no more than $100 you can purchase a good portable hand scanner.

enter image description here

The particular one shown above is a PASS200 Handheld Portable Scanner. If you look around, you'll find it has a lot of competition and you can pick a model with the features you want.

4
  • 1
    You might want to check if the scanner you're looking at will harm the pictures.
    – Luke_0
    Commented Jul 2, 2013 at 22:46
  • @luke - From what I understand, a single scan is so insignificant in total light applied, that any effect would not be detectable. Photos fade only when exposed to light for long periods like hours or days.
    – lkessler
    Commented Jul 3, 2013 at 1:53
  • It depends on a lot of factors, but what you say is normally the case. The exceptions are enough to warrant some precautions, however. Old low-grade paper, for example, doesn't take much to get damaged, especially if it has been exposed to sunlight a lot over the years.
    – Luke_0
    Commented Jul 3, 2013 at 2:00
  • 2
    @luke - Still, it is always better to scan something once and use the scan for everything, while putting the original away in archival storage and never needing to access it again.
    – lkessler
    Commented Jul 3, 2013 at 3:21
3

To help with reflections buy a piece of non reflective glass from your local picture framers. Make sure you protect the edges of the glass so you don't cut yourself or damage the photo album. The weight of the glass helps to keep the page flat and then photograph with a digital camera editing as necessary in a photo editing programme.

Some programmes such as Photoshop allow you to take one photograph of a page of photos and then it will automatically split it into the separate images for you.

Use a tripod to support the camera to get the best quality results.

3
  • Note, Photoshop is now very expensive ($600 per year). Most any image editing program should be able to do this simple task. See this page for free photoshop alternatives.
    – Luke_0
    Commented Jul 3, 2013 at 13:59
  • The full-blown version of Photoshop may be expensive, but the cut down Photoshop Elements is often included with scanners or other hardware.
    – Sue Adams
    Commented Jul 5, 2013 at 15:30
  • The think that both of you missed that I was saying was the AUTOMATIC splitting of a scan of multiple images into single images. If you are going to recommend alternative software ensure that it has the functionality that was mentioned in my OP. AFAIK this is not available in Photoshop Elements.
    – Colin
    Commented Jul 7, 2013 at 5:28
3

Removing photos from adhesive albums risks damage, so scanning them in situ is a good insurance policy.

Two types of portable scanners are suitable. A range of wand type scanners are available. These are dragged across the page by hand, which I believe takes a bit of practice to achieve a good result. An easier to use alternative is a small flat-bed scanner that scans a small area which may be stitched together later. I know of one model, the flip-pal scanner http://flip-pal.com/. The lid comes off and the scanner is turned over and placed on top of the original.

In general, these scanners are easy to use and produce a good results for most workaday purposes. The scanning resolution is limited to 600 dpi or ppi (dots or pixels per inch) and there are only a few settings available.

So, scanners largely overcome problems with glare, lighting, and produce consistent results, which is more difficult to achieve with a camera.

Scanning whole pages in sequence is a good way of recording the arrangement of photos within an album, which preserves context of the collection. Combined with notes on what you know about the person who complied the collection, this can be a valuable research resource. Once you know what the albums contain, you are in a position to decide what is worth preserving more carefully and whether you want higher quality copies.

Reasons I would remove the photos from the albums are:

  1. Chemicals in the adhesive are not kind to photos in the long term, so consider re-housing the more important photos in better storage.
  2. I would scan both sides of the photos. Even those that are not annotated have clues like photographer's advertising and marks (older photos), and processing date or brand of photographic paper (modern), which are important for dating the photo.
  3. Some photos may warrant a high quality copy, which is best achieved without the barrier of the album film.

Update: I have just come across a mouse that also scans http://www.irislink.com/c2-2457-189/IRIScan-Mouse---Mouse-Scanner.aspx , which may be another suitable alternative.
1

I have been scanning a series of old adhesive "Magnetic" photo albums from the 1970s. My work flow has been like this:

  • Cut a page out of the album with scissors or a knife (careful not to cut through photos on the back of the page).
  • For some albums, the page will then "unfold" and you will have a separate page for the front and back of the original page. Cut those apart.
  • Now the single page will fit on the flatbed scanner. I scan each photo individually so that the exposure is optimized for each photo.
  • Remove photos from the adhesive with a micro-spatula and or dental floss. (See how-to video from the Smithsonian). For the most difficult photos I just cut them out of the album, leaving them stuck to the cardboard backing rather than destroy them trying to get them loose.
  • Rename the scanned files according to what's in the photo or anything written on the back.
  • Crop, refine and clean up each scanned image in photo editing software.
  • Put the liberated physical photos in new plastic photo album pages.

Make sure you have a system for backing up all those digital photos. This can take a while. I have been working a couple hours a day for months on this, for maybe 10 albums.

1

Removing the photos from the album has the following disadvantages:

  • You might damage the pictures
  • You might not be able to replace them back in the album (adhesive has dried out).
  • You might damage the album.

And the following advantages:

  • You get the best scans once you take the covering off the photos
  • You have access to the back of the photos - which can have lots of information. (Captions, photographer's name /address, printing date, etc)

I have successfully taken albums apart and put them back together. I have also had albums literally "fall to pieces" when I opened them.

0

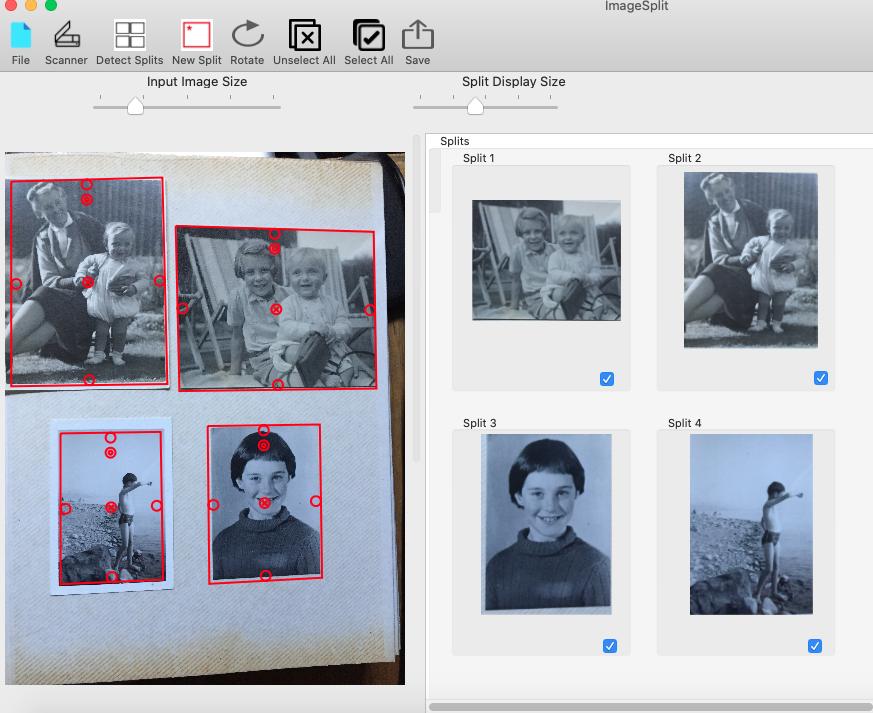
Digital cameras have become commonplace since this question was asked in 2013 and can provide images of large album pages which can be processed by various auto-splitting programs to yield individual digital images of each photo on the page. Using a camera allows processing of large pages and avoids any risk to the album by removing photos. Mobile phone cameras may not have a very high pixel resolution, which may limit viewing of extracted images to hand-held devices. Digital cameras generally have higher resolution and give better results.

Many programs for this purpose are reviewed at https://turbofuture.com/graphic-design-video/Whats-the-Best-Multiple-Photo-Scanning-Software. Different programs have widely different performance in automatic mode so it's worth testing a few. Many have the option of adding frames (or splits) manually but this is a slow process. Below is an image taken with a mobile phone camera, and automatically split using Caption Pro running on a Mac:Caption Pro for Mac .

Your Answer

By clicking “Post Your Answer”, you agree to our terms of service and acknowledge you have read our privacy policy.